JayP NAS 2.0 - A Real Home Server, Part 1: The Hardware
I've been running a homebrewed NAS for a few years now. You can read more about that system here. It's now running out of storage space and I'm really missing a handful of real server features, so I'm currently in the act of building a new home server. I plan on doing 3 articles here about this whole process. Part 1 will be going over the hardware and will include some pictures of the machine. Part 2 will be explaining the plan for getting that hardware running, such as making sure BIOS/firmware is up to date, stress testing things, why I picked the OS and RAID solution I did, etc. Then Part 3 will be putting it all together: installing the OS, setting up the RAID, copying data from the old to the new system, setting up the software.
As I said in the title, my goal this time around is building a real server. I want IPMI support for remote BIOS level control of the system, ECC memory, a proper HBA card, etc. The biggest problem I've felt while planning this is that there isn't something exactly for my purposes. Things are either a bit over kill or not quite enough to last me the years I'm hoping to keep this. Therein, some decisions I've made are probably not necessary for most people doing something similar or might seem short sighted to some. With that, here's the basics:
The Specs
- Motherboard: SuperMicro X11SSH-LN4F
- CPU: Intel Xeon E3-1245v6 (4 Core, 8 Thread 3.7GHz base clock, 4.1GHz Turboboost)
- RAM: 64GB (4x16GB) Corsair DDR4-2133MHz ECC
- Case: Silverstone CS380B
- PSU: Corsair RM550x
- OS Storage: Samsung 960 Evo 250GB NVMe SSD
- HBA Card: LSI 9207-8i
- Storage Drives: 8x6TB Seagate IronWolf NAS
- Misc. pieces: 2 SFF8087 to 4 SATA data cables (connects LSI HBA to case's backplane for hard drives), 3 Noctua NF-F12 case fans (replace the included case fans with PWM fans for in OS fan control), a Noctua NH-U12s CPU heatsink/fan
Now, why did I pick these items? Lets start off the key components.
CPU/Motherboard
My current system is based around an AMD A8 6500 CPU and "consumer" mini-ITX motherboard. I'm not opposed to mini-ITX for these kinds of systems, but my goal this time around is a well rounded ability to expand later. That means at least micro ATX. The CPU I had hasn't aged super well and wasn't particularly new when I got it. This time I wanted to make sure I got the latest possible chip. I was debating at looking at a Xeon-D based system because of it's lower TDP (power consumption) and surprisingly great performance for what it is, but ended up going to a more traditional setup. The Xeon-D's that are available right now are getting long in the tooth and replacements are due to be announced eventually here, but them actually being available is even farther off. I could have gone up to a Xeon E5 system, but I see two problems there. First, the current generation isn't brand new either and a replacement will be out around this summer I believe but I'm buying before that. Second, the price to performance ratio just isn't worth it for me. I mean, the performance is there but I don't need to be dropping so much just to get a CPU.
So, I decided on a Xeon E3-1245v6. Latest generation, only a couple months old and still hard to find retail. I could have gone for a E3-1240v6 and gotten the same performance, but the 1245 model adds an integrated GPU. It's not necessary but down the road I can utilize that GPU for video transcoding.
The motherboard was a balance of choices. First, I definitely wanted IPMI. Most server boards have that, but not many workstation boards. Second, I wanted M.2 NVMe support for the OS drive. Most of the cheaper boards skimp on that feature so I had to start in the mid range. I also plan on doing more VM work this time around, so I wanted to make sure I had Intel VT-d support, which means I need a C236 chipset.
At the end of the day, the SuperMicro I picked fits everything I need now and gives me room to grow. It works with Kaby Lake Xeons, so my CPU choice works fine. I may need to do a BIOS update to make it work but it will. It has the M.2 NVMe support I want, and 8 SATA ports on top of that ("Why not use those instead of the HBA?" I'll answer that later). It's got a few PCI-E slots to grow into if I want to add 10Gb NIC's later, another HBA, or even a graphics card. The biggest limiting factor for my purposes is also the next topic, so lets go ahead and discuss it.
RAM
Xeon E3's are limited to 64GB RAM. Now, that's a lot. A whole lot, relative to the 16GB I have in my gaming desktop or 8GB in my daily driver laptop. Xeon-D's can double that up to 128GB, and E5's can do way more. The reason you'd want more is mostly software based. If you run enough VM's that RAM really comes in handy. Ultimately I'm deciding that in the future I won't need more than 64GB RAM, which is a bit of a risk... and the reason I'm maxing it out now. By setting the stage right now, while I'm first starting to play around with things, I'll (hopefully) know now if I've gotten too little. I doubt it is too little, frankly I know I can easily live off 32GB for this new system, but it's my biggest concern with the future of this new machine.
Case/PSU
The case was by far the hardest choice. Not because there are so many options, or a dead even Pro's/Con's list, but because no one's making cases for my situation. The Silverstone CS380 is by far the closest case to my needs. Frankly, it does match them dead on, I just wish there were other options since there are few design decisions I really don't care for on this.
One big feature I wanted was hot swappable hard drives. It's very much not necessary, but something I really wanted. There are a decent number of cases out there with hot swappable drive bays, but not as many as I'd like. I could have gone with a traditional server chassis, which almost universally have hot swap bays. Only the cheapest don't include them but you can pickup addons to get them. The biggest draw back there is either a tower server chassis or a rack server both use small, loud fans. I don't have a closet to tuck this server into, nor a basement to store it out of sight and mind. This system is going to sit under my TV. I hunted for one that at least uses 120mm fans, thinking I'd swap in Noctua's that are nice and quiet. The only options I found there are either very questionable build quality, ridiculously expensive, or requires me to compromise some other choice.
So, in the end, I picked the Silverstone. The biggest grips I have with it are the included fans, the way the hard drive backplane (major part of what makes the drives hot swappable) is setup in the case, and the way the side panels bulge out. The fans are an easy fix, at least. The hard drive backplane has a bunch of capacitors that stick out into the empty air of the case. This isn't that big of a deal, but when I started the actual building I noticed a few were pointing out at odd angles. I think the front panel wiring knocked into a couple during shipping which is worrying. They're probably ok, but still. I might contact Silerstone and see if I can get a replacement backplane. As for the side panels, they just look awkward and means it has to stand up, I shouldn't put it on it's side. I'm gonna put it on it's side since it shouldn't really be that big of a deal, but it'd be nice if I didn't have to worry about it. It does provide room for excess cabling to go, which is nice, but why not just make the case thicker?
Since this is otherwise a standard desktop case, I went with a standard desktop PSU. If my math (and a few power supply calculators' math) is right, the system should hover around 300W at full load. The old adage I live by with picking a PSU is 20% more than you need, anything extra is gravy. I've been using Corsair PSU's for a years now, I really like the RMx series they've been doing for a bit now, and 550W provides me room to add some extras down the room without replacing the PSU, so it was an easy pick.
If I had gone with a more traditional server I almost certainly would have gotten something with a hotswappable PSU. Honestly, it's totally not necessary in a system like this, I just like the idea of it.
Storage
For OS storage, I wanted more space than I had before but also realize I don't need to go nuts. The old system had a 120GB mSATA SSD, I figure doubling it is more than safe. The big reason I wanted NVMe for the OS drive is to cut down the boot time. A lot of this server grade hardware I picked up introduces much longer boot cycle than consumer hardware, and reducing it where I can helps. Plus, latest and greatest and all that jazz.
Now, the crux of a system like this is the mass storage. This post is all about the hardware, but your decision on how you're going to setup your drives can really inform your decisions around the hardware. At the end of the day, no matter if you're going with unRAID, ZFS, MergerFS+SnapRAID, Linux mdm RAID, hardware RAID, for a system like this you basically have 3 choices: Seagate IronWolf NAS, Western Digital Red, and HGST NAS drives. Why? These drives are built to be in a RAID. They're physically designed to be stacked alongside other drives, and the controllers have features designed to be used in a RAID setting.
Side note: If you want you go to the higher end models like IronWolf NAS Pro, Red Re's, you certainly can but I think it's unnecessary for 99% people building home servers. The extra performance is minimal for our uses, the higher life expectancy is unlikely to come into play for the majority of us, and the price jump isn't worth it if you're buying a bunch of disks at once.
So, back to our three main choices. Picking between the 3 brands is really a matter of brand loyalty, trust, or price. I'm not partial to any brand of the 3, I trust them all equally, and the Seagate and WD options trade blows on price week to week. I got lucky and noticed a sale on the Seagates dropping their price by $25 per unit, $15 per unit less than the lowest price I've ever seen them so I jumped on it. It also helps that the 4x4TB Seagate NAS drives I have in my current system are still running strong.
Some people recommend purchasing particular external hard drives and "shucking" them to get specific models of drives. This is actually a decent option to save a good bit of cash. Best Buy has had an 8TB WD external drive on sale for like $200 a lot lately, and the drive inside the shell is a WD Red. The reason I didn't do this? Shucking them breaks the warranty. If you're super careful you can get the drives out of the shell without damaging anything, and if there's a problem and you're (again) super careful you can put it back in... but I don't trust myself doing that. I'd rather have the piece of mind of knowing I have the full warranty of my drives.
Now, lets talk about HBA cards. HBA's are different from a RAID card, as an HBA has no real logic capabilities. It acts as little more than adding additional storage to a system. There are a lot of RAID cards that can be flashed to "HBA mode," specifically a number of LSI cards can be put into "IT" mode. That works, and works plenty well for the vast majority of people, but there are some limitations to that setup. A common complaint is that SMART (hard drive testing and health reporting that's built into basically every hard drive) doesn't function very well in such a setup. A lot of people recommend shopping on eBay for used parts, which I actually support as well if you're on a budget. That's an easy way to save a decent chunk change quick. At the end of the day I decided to go the route I did based on a few factors.
- I know I won't do a hardware RAID option. Having the ability to do so isn't necessary.
- I want to setup as much software level data collection about the system as humanly possible, so I want to be certain SMART will function.
- I really don't want to buy used parts for this build. I want the full warranty on everything.
So I want a "real" HBA card, brand new. The LSI 9207-8i provides 8 SAS/SATA ports. The thing to note here is the chipset itself comes in a lot of flavors and from a few manufacturers, so I highly recommend shopping around. The prices range from around $100 up into the $300's, but they're all the same.
Now, the reason I decided to get an HBA even though this board has 8 SATA ports: cache SSD's. I'm not doing it yet, but if and when I add a couple SSD's to use as RAID cache storage, they need to plug in somehow. I originally wasn't going to outfit all 8 hot swap bays but wanted to make sure I could fill them all with drives for the RAID, so that meant I'd need more ports.
Misc. Parts
Cooling in my old server is a nightmare. Mostly because it's an AMD system in a mini-ITX form factor. Yeah, I said it. Deal with it AMD fanboys: those systems run hot. So part of the plan this time around is ensuring I have quality fans. That sadly didn't work out quite as well as I had hoped. I'm actually running my stress tests right now and I'm quite pleased with the temperatures I'm seeing and the fans aren't even loud yet, which is great.
I picked up a Noctua NH-U12S heatsink/fan for the CPU. I've used Coolermaster Hyper 212's (plus and Evo models) for years, but considering how much I'm spending on the rest of this system there's no reason to skimp on the CPU cooler. It's a similar size, but I like the way the Noctua mounts far more than the Coolermaster. The biggest complaint I always had about the Hyper 212 was how much of a hassle it is to mount it. Noctua's setup is a lot easier. Granted, it's not exactly intended to go on a server motherboard so it's not "perfect" but it wasn't remotely as troublesome as I was worried it'd be. If I were to mount the fan so it's blowing towards to the top of the case I'd have no problem, but I wanted to mount it so it's blowing towards the back of the case to help with over all air flow in the case. Since the RAM is positioned "north" of the CPU instead of "east" it's a tight fit. I mounted the fan onto the heatsink so the bottom of the fan is flush with the bottom of the heatsink fins which works, there's even clearance to add or remove all 4 RAM modules without removing the heatsink/fan, but it made me a bit nervous out of the gate. With the Silverstone's bulged side panels I think almost any tower heatsink will fit except the most ridiculous, and for some reason there's even water cooling tube inlets on the back of the case but I don't know how easily you could fit a more common all-in-one water cooling kit.
The Silverstone comes with 3 120mm fans, two on the side of the hard drive cage and one in the rear. Now, my experience with the old NAS says, "make sure it has 4-pin fans!" which the included fans are not. So I picked up 3 Noctua NF-F12 PWM fans. They installed quite easily into the case and although the colors are bit meh (dark beige and a light mud brown), they actually look OK when it's all put together.
The issue is... at the end of the day due to how the motherboard works, that PWM isn't exposed anywhere to the OS. So I can't use software control of the fans as I'd hope, I have to use Supermicro's IPMI fan control. Plus, since the fans are capable of running at such a low speed the motherboard freaks out a bit and fluctuates between low and full speed. I worked around this, which I'll explain in the Part 2 article, but man... what a hassle.
Finally, if you're getting an HBA card you'll need matching cables. These are easy to find and cheap, but very dependent on your other hardware. Figure out what the "output" on the card is and how you'll have to plug it in. Not all cards output SFF-8087 like mine. Some cases I saw use SFF-8087 inputs which the backplane then breaks out independent. Shop around a bit but try to at least recognize the brand you're buying.
So it's built. What was it the process like?
Overall not as bad as I expected. Here are some notes from the build.
The Good:
- Supermicro includes a handy quick reference guide in the box, but no manual. The quick reference guide includes everything I needed for the build process. Map of the board and specifics like the front panel button pins. Everything you need if you know what you're doing. I actually really liked having it. That said, I've built dozens of computers over the years, so if you're inexperienced download the PDF of the manual.
- The case's side panels are sturdier than I expected and I think I'm comfortable laying it on its side.
- The case was decent enough to build in. Not the best I've ever experienced but by no means the worse.
- Installing the hard drives was quite simple thanks to the hot swap bays. The hardest part was mounting them to the hot swap tray, which is literally just screw in 4 screws.
The Meh and/or Bad:
- The PSU's motherboard cable is too short. This isn't the fault of the PSU, more a fault on my part due to planning. The motherboard's 24 pin PSU plug is on the north edge of the board, about in the center. On consumer boards that plug would be on the east edge, roughly centered. In the end this works, but it's a tight fit over the RAM. The 8 pin CPU cable is also a tiny bit too short, but it fits much better than the 24 pin. I need a cable that's a good 6 inches longer to be comfortable with it... I ordered cable extension for the 24 pin and 8 pin CPU cables so I can route them in a way I'm more comfortable with. That's the only option as the cable length from Corsairs is quite standard, if not on the long side.
- Figuring out the right way to wire the case fans to the board was a hassle. I ended up doing it 3 or 4 times. If you get a similar system and want to learn from my mistakes: The CPU should plug into FAN1. FAN2, 3, and 4 should go to fans that can help cool "peripherals near the CPU" (aka: RAM), which for me is basically just the back fan. FANA is for "other peripherals," but there's only one lettered fan plug so I dunno what exactly to do there. The Noctua fans come with a Y fan plug so I used that to plug both fans over the hard drive cage into FANA.
- The case does lack in the department of cable routing. I'd prefer a couple cutouts above the motherboard and more zip tie points on both the front and back of the motherboard tray.
- The hard drive trays feel a bit cheap. They work plenty well, but if you're at all used to "real server" hot swap equipment these will feel like cheap plastic crap.
Thoughts for the manufacturers? (liked they'd ever catch wind of this...)
- Silverstone: I've harped on it already, but seriously the side panels are dumb. Just make the case wider. Making it about 2 inches taller so you can fit in some more cable routing options above the motherboard will help people that get real server motherboards. If I could have routed my 24 pin cable directly to the north edge the cable wouldn't be too short. I'd also like to see the backplane's capacitors better protected, or the front panel cables secured better for shipping. The packaging outside of the case was fantastic, bring that thought process to the inside.
- Supermicro: I'd really like to see more fine control of the fan system. I'd like the ability to set target temp. curves to specific devices (CPU, peripherals, generic system) and to assign specific fan ports to a specific device's temp. Or maybe a way to expose the temps and fan control to lm_sensors/fancontrol in Linux.
- Noctua: more color options, please. I know they exist but they're not particularly easy to find. Otherwise, you guys are great, keep it up.
- Cosair: You're perfect how you are.
- Intel: What about a Xeon D line targeted at the homelab market? 128GB RAM support, 4-8 core with hyperthreading, higher clock speed (at the cost of higher TDP), and not too expensive.
- Samsung: You're perfect how you are.
- LSI: We're good? I dunno, first experience with LSI stuff and I don't have much to compare to.
Pics or it didn't happen!
So you want to see it, eh? Want to see what $3200 worth of silicon, PCB, and metal looks like? I snapped a few pictures, but the lighting in my build area is pretty crap. Here are some OK ones, and a couple screenshots to boot.
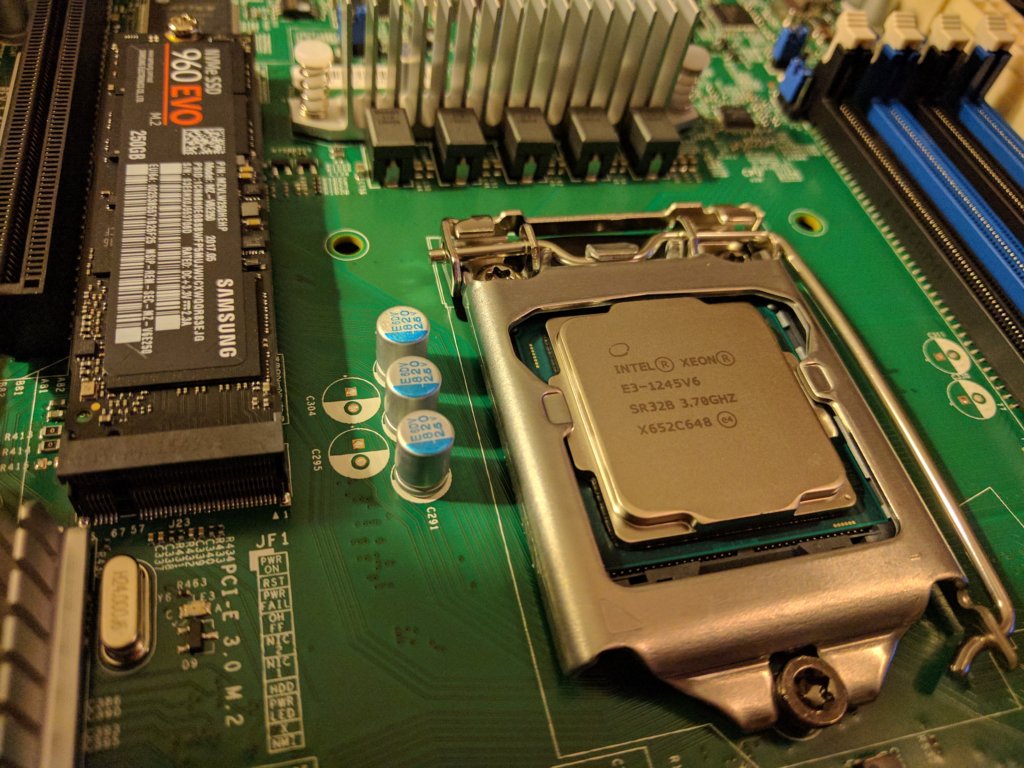
This is probably the artsiest pick of the bunch. I was till waiting on the RAM and case to get in but started putting together what I could and unboxing everything else.
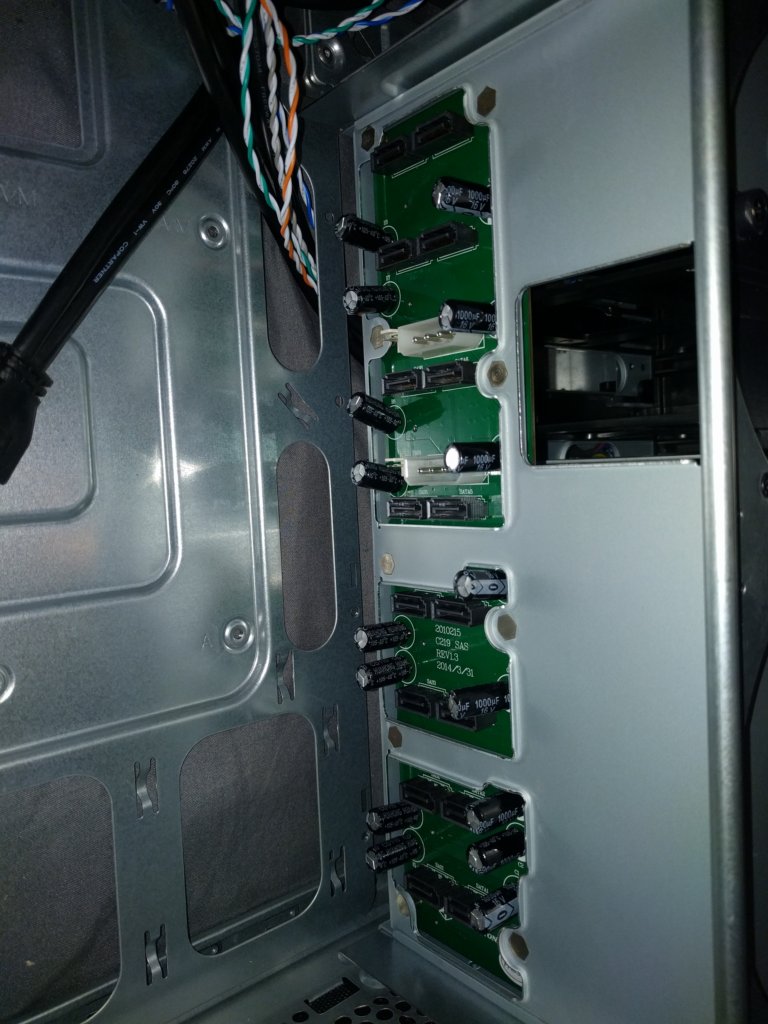
Here you can see the capacitors sticking out at odd angles I mentioned... Anything that at a right angle to the green piece is not quite right. While building I was extra careful when routing cables to not disturb them further.
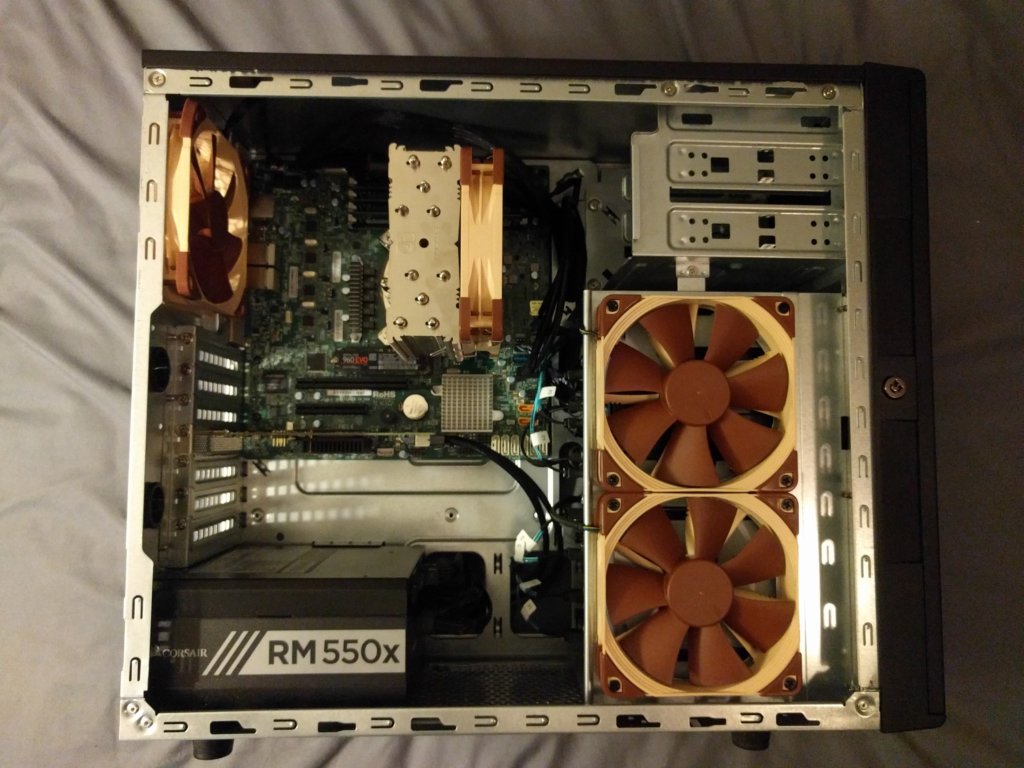
Everything's put together and all the cables are routed. It's not quite as clean as I'd like, but when I get the PSU extension cables I'm gonna tighten it up more.
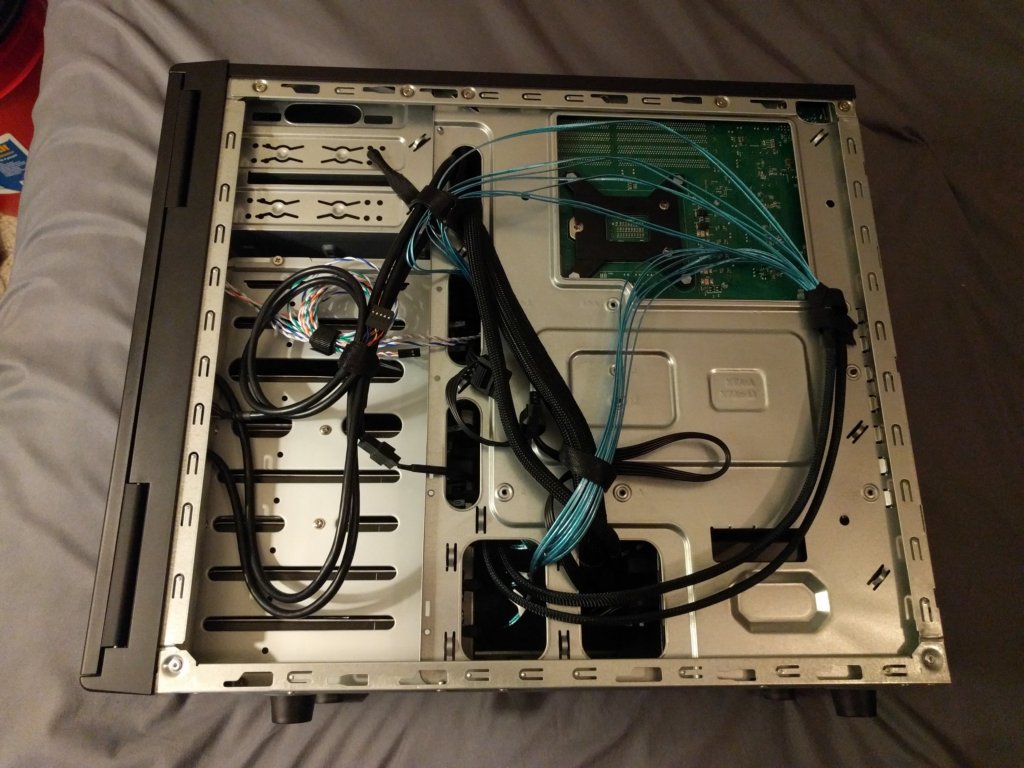
Now, the backside is a mess. I velcro zip tied a bunch of stuff together for now. Again, when I get a chance to redo it I'll clean it up as best I can.
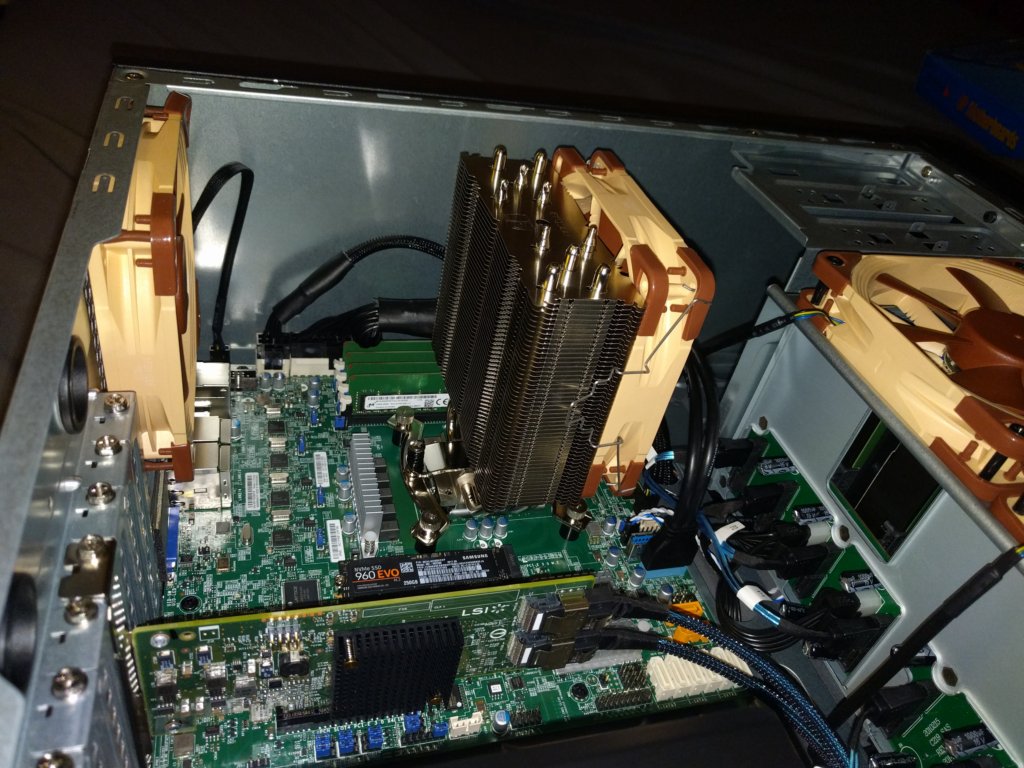
A close up of the interior. You can see the 24 pin PSU plug hanging over the RAM better here. The CPU's fan looks to be sticking up high but that provided the clearance for the RAM.
I ran a single memtest86+ test last night via the IPMI/iKVM interface. I love iKVM, such a game changer for me. Personally I'm not worried about doing a bunch of passes with fresh memory, in my experience as long as it gets through one full pass successfully it should be fine.

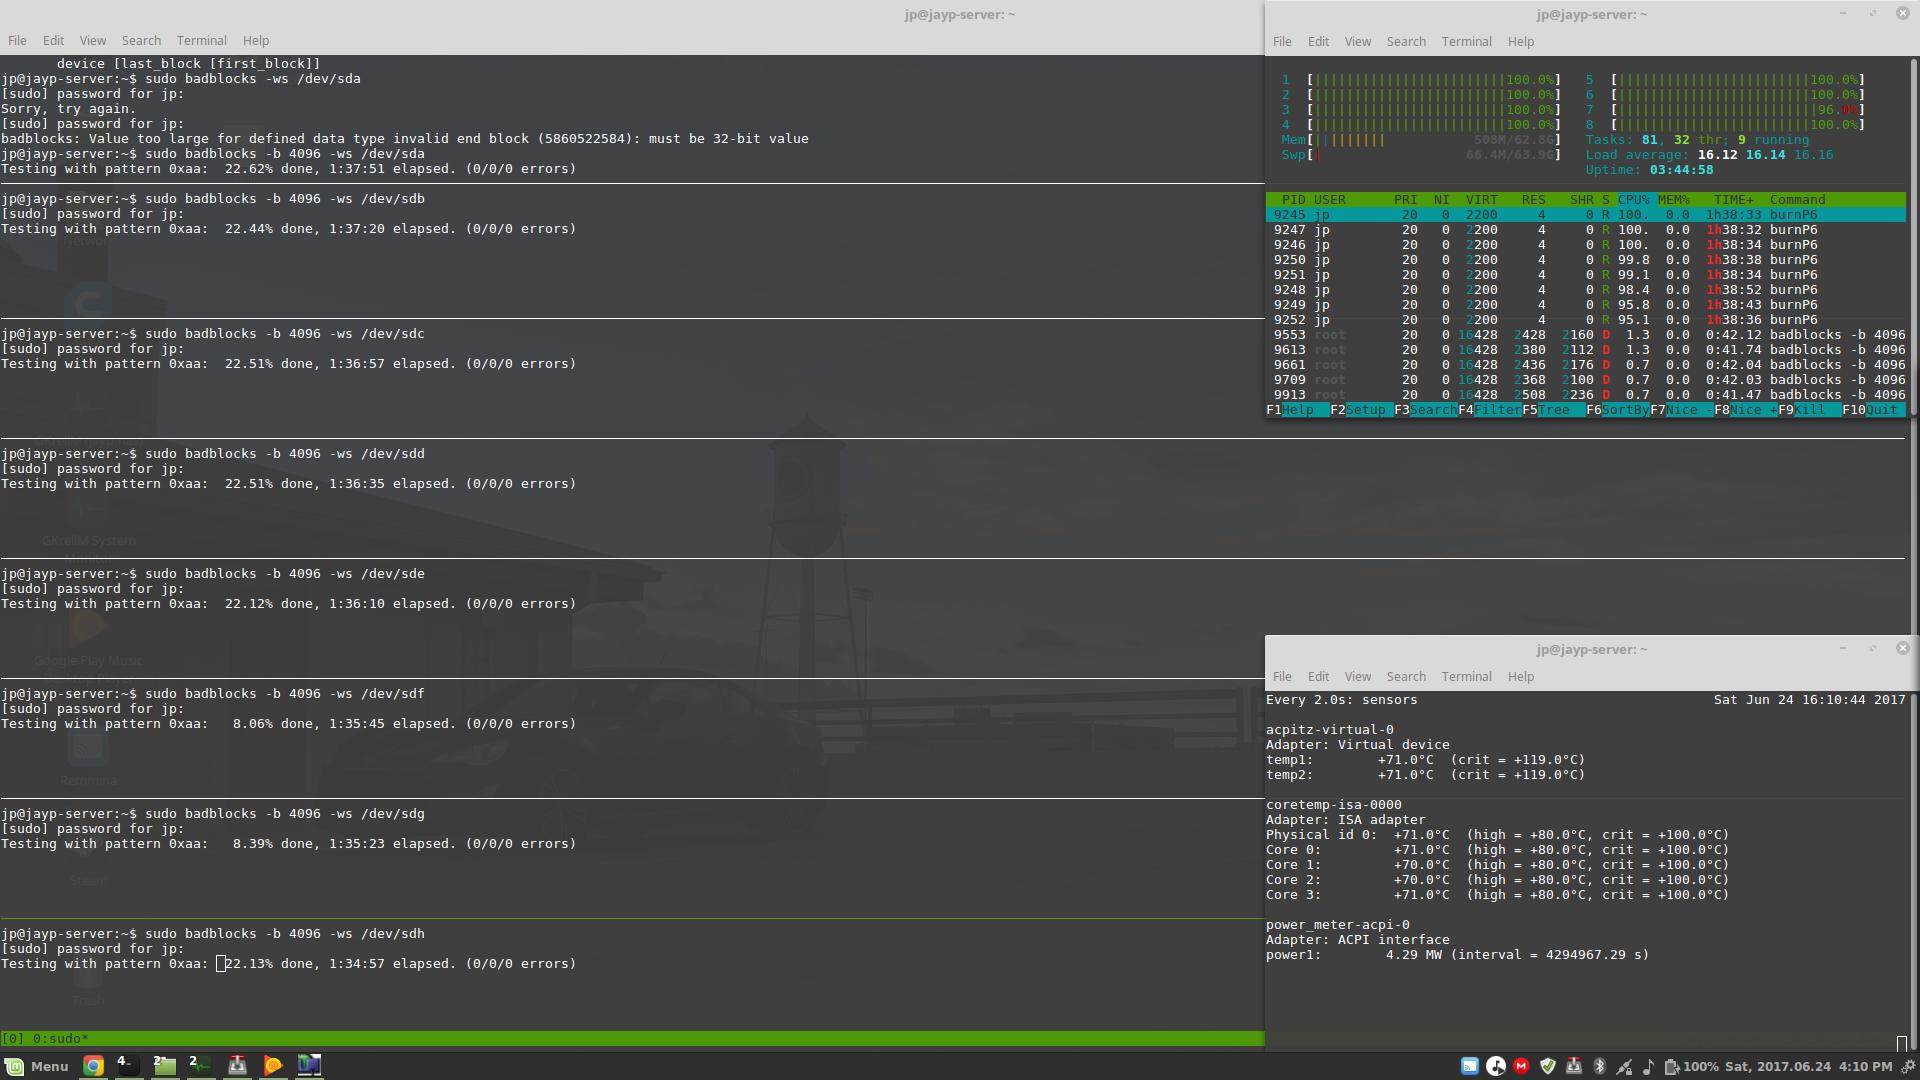
Lastly, here's a screenshot of the 3 terminal windows I have running while stress testing/doing a "burn in" of the hardware. Top right is an htop screen so I can monitor what's running, bottom right is temperatures, and the big window is a series of 8 concurrent badblocks runs I did to run all 8 hard drives.
In the htop window you can see 8 burnP6 processes running. The goal here is to max out the CPU. I ran it first for 2 hours, where the temps stabilized around 70C. I killed all 8 processes to see how fast the temps would drop back down to normal levels. Within seconds it was down to the high 40's. I let it rest for about 30 seconds then started it back up again for another 2 hours. In that 4 hour window the highest it hit was 72C on one core. The fans didn't even get to 70% of full speed, which is fantastic.
As for the drive tests, I ran a series of SMART tests before badblocks, and when it's done I run them again. If everything comes back clean I'll trust the drives. If anything isn't right I'll get a replacement from my vendor while I can.
What's next?
I'll do another CPU burn test over night tonight. I want to give it a good 12 hour heat soak to see how it does. Once testing comes back clean on the CPU and drives I'll wipe out the Ubuntu install and do it again. Then setup the RAID and start copying data over. The copy will likely take at least a couple days so that's when I'll be setting up the other stuff. I'll start writing up Part 2 soon.