
Building a Dedicated Valheim Server on Ubuntu Server 20.04
In the last couple of weeks Valheim has been growing in popularity at a rapid pace, and a few folks at work and myself definitely jumped on the viking themed bandwagon. I decided to spin up a quick VM on my home server to create a dedicated server. While doing it I noticed there isn't a ton of great documentation on the way I did it, so I figured why not do it myself.
Table of Contents
Notes to get started
First of all, it's worth mentioning, there are a few routes to host a dedicated server. Doing so on a Linux based VM absolutely isn't necessary, but if you have the resources available to you it's potentially a lot cheaper to run, and gives you finer control over many aspects compared to a dedicated game hosting service.
As mentioned, I have a home server running Proxmox I already host a number of VMs on, so for me it made sense to just do this there. However, this can easily be done on AWS, Linode, DigitalOcean, or many other hosted solutions. This document is intended as a step by step guide assuming you're already sitting at an Ubuntu Server 20.04 bash shell. I may add some extra info later about getting to that point.
If you are creating a VM, I've read a lot of people are running servers just fine with 2 vCPUs and 2-4GB RAM. Storage wise the game needs very little, it's ~1GB total including things like logs and whatnot. My VM is a bit more robust as I have the resources available to do so. I did 4 vCPUs, 4GB RAM, and 64GB of storage. I also used Ubuntu Server 20.04 for this as it's my go-to VM OS.
Also, while a lot of this guide will be basically a "copy/paste guide" so you could do this without much previous knowledge of linux, future maintenance will almost certainly require some background knowledge on navigating linux and using it's built in tools. Given that the game is still in early access, there's also a very good chance the server software for the game could change drastically with time and this guide could get out of date quickly. At the very bottom of this page you'll find a timestamp for when it's been last edited, please use that to gauge if it's still valuable to you.
Getting the basics installed
With a fresh Ubuntu Server 20.04 instance, I'll make a a couple suggestions to start. First, lets ensure our timezone is set right so things we do later run when we expect them to run. We need to run a couple commands to do this.
First, lets find out what timezone the server is currently in. We can run the command timedatectl to do this. It will output something like this:
$ timedatectl Local time: Wed 2021-03-10 20:10:05 UTC Universal time: Wed 2021-03-10 20:10:05 UTC RTC time: Wed 2021-03-10 20:10:06 Time zone: Etc/UTC (UTC, +0000) System clock synchronized: yes NTP service: active RTC in local TZ: no
By default Ubuntu Server 20.04 doesn't set a timezone. Some hosting providers may do this for you based on the data center they're hosting in. If you see something like above, namely that Time zone is UTC, that means it's on GMT. I, for instance, am in Pacific time zone, so I need to change this. You can run the command timedatectl list-timezones to see a full list of time zones that are supported. I would run the following command:
sudo timedatectl set-timezone America/Los_Angeles
If we run timedatectl again I'll get the following out.
$ timedatectl Local time: Wed 2021-03-10 12:12:33 PST Universal time: Wed 2021-03-10 20:12:33 UTC RTC time: Wed 2021-03-10 20:12:34 Time zone: America/Los_Angeles (PST, -0800)System clock synchronized: yes NTP service: active RTC in local TZ: no
Later on we'll be setting a number of cronjobs to run certain tasks automatically, and this will make it so the server and we are on the same time, so there won't be any need to do funky time math to ensure we're running things when expected.
I also like to have a simple little shell script that checks for and applies updates to the system. It will also tell you if you need to restart the server. To create this file run the following commands:
touch chkupdates.sh
chmod +x chkupdates.sh
nano chkupdates.sh
With the file created and open, copy/paste the following in:#!/bin/bashecho '#########################'echo '# Performing apt update #'echo '#########################'sudo apt updateecho '##########################'echo '# Performing apt upgrade #'echo '##########################'sudo apt upgradeecho '#########################'echo '# Do we need to reboot? #'echo '#########################'if [ -f /var/run/reboot-required ];then echo 'Yup, you should reboot.'else echo "Nope, you're good."fi
I also recommend running that file right away to make sure the system is fully updated before continuing.
With the system running and updated, we can begin installing Valheim. To do this we'll use the LinuxGSM project. This a great project designed to install many different self-hosted games and game-adjacent tools (such as TeamSpeak), as well as basic maintenance for these. LinuxGSM typically recommends creating a dedicated user for installing and running the tools. Given that this VM server is being setup only to run the game, I think it's not necessary in this regard. However, if you are going to running many game servers on one device/VM, it is the right decision to create dedicated users. More information from LinuxGSM on Valheim server itself is available here and here.
First, we need to get some tools and systems added to make everything work. The following command will do the brunt of the work:sudo dpkg --add-architecture i386; sudo apt update; sudo apt install curl wget file tar bzip2 gzip unzip bsdmainutils python util-linux ca-certificates binutils bc jq tmux netcat lib32gcc1 lib32stdc++6 steamcmd
The following is optional, but highly recommended. Gamedig will allow LinuxGSM to get more information from the game server. This helps a lot of the basics of running the server, namely showing the current number of active players. If you're futzing around and need to restart knowing if you're about to kick someone out is a good idea. The following commands will setup and install nodejs, npm, and game dig.sudo apt remove --purge nodejs npmcurl -sL https://deb.nodesource.com/setup_12.x | sudo -E bash -sudo apt update && sudo apt install -y nodejsnpm install gamedig -gsudo npm install gamedig -gsudo npm update -gsudo npm list -g gamedig
I also decided to go ahead and add the the npm update -g command to my chkupdates.sh script to ensure gamedig and npm stays up to date. The file now looks like this:
#!/bin/bashecho '#########################'echo '# Performing apt update #'echo '#########################'sudo apt updateecho '##########################'echo '# Performing apt upgrade #'echo '##########################'sudo apt upgradeecho '###################################'echo '# Performing npm update (gamedig) #'echo '###################################'sudo npm update -gecho '#########################'echo '# Do we need to reboot? #'echo '#########################'if [ -f /var/run/reboot-required ];then echo 'Yup, you should reboot.'else echo "Nope, you're good."fi
With this done we're ready to actually install linuxgsm and the Valheim server!wget -O linuxgsm.sh https://linuxgsm.sh && chmod +x linuxgsm.sh && bash linuxgsm.sh vhserver./vhserver install
You now have a Valheim server! There's a bit more to do, though.
Configuring LinuxGSM and the Valheim server settings
Now we want to go configure our server settings. Lets change directory into where the config files are to make this easier.cd ~/lgsm/config-lgsm/vhserverls
You'll see a number of files. The main ones we care about are _default.cfg and common.cfg. To make our life easy in the future, the best idea is to make backups while we're working. The main thing right now is making a copy of common.cfg then copying _default.cfg to make a new common.cfg.mv common.cfg common.cfg.oldcp _default.cfg common.cfg
The reason we do this is so in the future, if LinuxGSM needs to make changes, _default.cfg is left alone. As the server admin when there are updates to LinuxGSM or the game server you can check _default.cfg to see if you need to make updates to your common.cfg file. The common.cfg is where we'll be storing our settings for the server, things like the server name, passwords, enabling/disabling public access (adds it to or hides it from the in game community list), etc. By doing the above we allow the scripts to maintain themselves, gives us an idea of what they used to look like (in case you make mistakes), and easily make changes without fear of being able to recover from mistakes.
We can edit our config with a simple nano common.cfg command. You only want to change what is inside the quotes for each option. The main settings to change are as follows and all listed at the top of the config file:
- servername: This is your server name. If you are creating a public server, it's what is listed in the community server list.
- serverpassword: If you want to lock your server behind a password, enter it here.
- If you don't want to require a password, simply have a line that lines
serverpassword = ""and you'll have an open server.
- If you don't want to require a password, simply have a line that lines
- port: by default this is set to 2456. This is the main game port. It also uses 2457 by default for "query" which is how something like Steam can find information about the server.
- If you change this, the query port will be whatever you enter +1, so if you set the port to 5454, the query port will be 5455 for instance.
- gameworld: by default, this will equal server name. If you are importing a game world, you'll want this to equal the name of the game world.
- More about this later. Most people will suggest allowing the gameworld for your server to be freshly created, personally I wanted to carry my single player map in.
- public: This changes whether the server shows up in the community server list or not. Setting it to 1 makes it public, setting it to 0 makes it hidden.
- Personally I set to this 0. I setup my server for myself and folks from work, and while a password is likely enough to ensure random folks don't connect, hiding it reduces the random-stumbler issue which will save you some bandwidth of someone just door-knocking your server.
There are a number of other settings to check. Scrolling down to see them will give you some more info on each, including links to the LinuxGSM docs on each.
- stats: set this to on or off. The installer asks you if you want to do this. Personally I left it on, LinuxGSM is a great project but reliant on those of us using it to help make it better. The decision is yours, but I encourage you to help the project!
- displayip: If you are going to get advanced, such as using a reverse proxy or something, you may want to change what the IP is shown as. The majority of users can ignore this setting.
- Alert settings: Check the documentation for this. Each alert type will require different settings. I setup a discord alert for us and the documentation made it super easy.
- updateonstart: I recommend setting this to on. It will make it so any time the server is started it checks for an update first. Highly recommend this for compatibility with your players.
- Since most users will let Steam automatically update their games, if their game version is not compatible with the server version they can't connect. Doing regular updates to the server reduce the chances of this being a problem.
- Backup settings
- maxbackups: When you start using backups, this sets a limit for how many backups to keep. More later on this.
- maxbackupdays: this will set the maximum age for a backup in the unit of days. Each time a backup is run, it checks the other backups and removes anything older than this number.
- stoponbackup: while not strictly required, highly recommended to leave this on. Stopping the server first means any backups created will be far less likely to corrupt your map, and will ensure the logs are fully updated to when the backup is finished. I can't say it will completely avoid corruptions, but it is significantly safer.
- Logging settings
- consolelogging: Enables or disables keeping logs from the game server console. Right now Valheim logs are not great in my opinion, but I'm an adamant believer of logging whatever you can. As is, the logs will show you when a player connects with their character name and a Steam ID value. If you'll be adding folks to an admin list, ban list, etc. this can be helpful.
- logdays: like the maxbackupdays above, what is the oldest log to keep.
I checked thru all the other settings and I'm personally happy to leave them alone. At least at the time of writing, everything else is safe to leave untouched.
When you're done making your changes hit ctrl+X to close, and it will prompt you if you want to save, hit Y.
Setting up automated tasks
Now we want to setup some automated items. We'll setup automatically starting the game server on VM bootup, as well as a number of cronjobs to run things without much input from you.
Starting the game server when the host server starts
First, lets setup automatically starting the server. As we're using Ubuntu 20.04, we can do this most easily with a systemd entry. You'll need sudo access to do this.
First, run the following command:
sudo nano /etc/systemd/system/vhserver.service
Now copy/paste the following:[Unit]Description=LinuxGSM Valheim ServerAfter=network-online.targetWants=network-online.target[Service]Type=forkingUser=<user>WorkingDirectory=/home/<user>RemainAfterExit=yes #Assume that the service is running after main process exits with code 0ExecStart=/home/<user>/vhserver startExecStop=/home/<user>/vhserver stopRestart=no[Install]WantedBy=multi-user.target
Before saving and closing this we need to check a couple entries. You'll notice a few entries have <user> in the lines. Remove the <user> part and replace it with your user name on the server. For instance, my server's user name is jp, so I use /home/jp for each item. That should do it, though.
Why are we doing this? Many linux daemons run as different users, and have different working directories. Even if a command is set up inside of standard environment directories, certain daemon systems need to be explicitly told where a command is with a full path. This is also true of crontab, which we'll be using shortly.
Now we need to get systemd to recognize and run things. First we'll reload systemd and then enable it so it starts at boot.
sudo systemctl daemon-reload
sudo systemctl enable vhserver.service
Now if you restart the VM the server will startup shortly after boot. You may have noticed that early on in the file it says it requires and waits for network-online.target. This tells systemd to not try starting the game server until the network service is actually functioning.
Cronjobs to automate lots of LGSM tasks
Next we'll setup a number of cronjobs to automate some of the micro-management type things we need to do with the server. Cronjobs are setup with crontab. This is a file that has a series of lines that dictate when something should happen, and what should happen. Most of the time crontab is run as root, but what we're setting up for crontab to run are scripts that are inside our user folder, so we can run crontab as the user that has all of this. If you created a new user, such as vhserver, for this you'll run crontab as vhserver. to start editing the crontab we just run crontab -e and start adding lines.
Before talking about what we'll be adding, you need to know how to use crontab scheduling. I won't go into extreme detail, or even a gloss over of it. Instead, I recommend visiting crontab.guru for assistance making your own schedule. I set my scheduled tasks that do or can restart the server to run very early in the morning to avoid interrupting my players. As such, you may want to just replicate my settings. If however you need to adjust the times, crontab.guru will help you figure out the right beginning to each entry to schedule them appropriately.
This is a copy/paste of my crontab, and I'll explain each item a bit more in detail. Like the systemd service file earlier, change <user> appropriately for your needs.# update check and update LGSM every sunday at 4am0 4 * * 0 /home/<user>/vhserver update-lgsm > /dev/null 2>&1# validate vhserver every sunday and wednesday at 4:15am (also performs a restart)15 4 * * 0,3 /home/<user>/vhserver validate > /dev/null 2>&1# backup vhserver every day at 3:45am (also performs a restart)45 3 * * * /home/<user>/vhserver backup > /dev/null 2>&1# update vhserver every day at 4am (restarts if update is performed)0 4 * * * /home/<user>/vhserver update > /dev/null 2>&1# monitor vhserver every 5 minutes (makes sure it's running)*/5 * * * * /home/<user>/vhserver monitor > /dev/null 2>&1# check-update vhserver every hour (will only send an alert)0 * * * * /home/<user>/vhserver check-update > /dev/null 2>&1
- The first entry runs every Sunday at 4am, and simply updates the LinuxGSM scripts. This shouldn't interrupt the game server. You could run it more frequently but it's generally not needed.
- The second entry runs a validate on the server files every Sunday and Wednesday at 4:15am. The validate will stop the game server, perform a check against Steam, and overwrite any necessary items. If you will be modifying your game files (with mods or changes to DLL's), you do not want to this and should either comment out the entry with a # at the beginning of the line or remove it entirely. However, if you plan to run a "generic" server, it's a good way to ensure the server is up to date, the game server files are not corrupted, and things are solid.
- In the future Valheim may have more "official" mod support and validating will probably not break it. As is, the mods are changing core files in the install, and thus will get over written every validate.
- The third entry creates a backup every day at 3:45am. As I configured my common.cfg file to perform a restart during backups, it will stop the server, create a backup, and start the server again. The backup created is a full copy of the home directory, so it will include the game map which is stored in a hidden folder.
- The rules for how many backups to keep and for how long were setup in common.cfg as well. I personally set both entries to 7. I want a daily backup for a full week, and nothing more. The idea being the world will have changed due to players building and whatnot enough in a week that anything older is not necessary, and anything more frequent than once a day feels like over kill to me.
- The forth entry simply performs a update every day at 4am. If there is no update available, it doesn't do anything. If an update is available it stops the server to update.
- The fifth entry performs a monitor command every 5 minutes. This monitor command allows LinuxGSM to ensure the server is up and working, and if not will send an alert and attempt to restart the server.
- Right now I actually commented out this entry in my crontab. There was a Valheim game server update that changed how private dedicated servers work, namely they no longer rely on Steam. This has a number of knock-on effects I think were unintended, but in the case of the monitor option it essentially broke it. Monitor will now restart the server every 10 minutes.
- The sixth entry performs a check-update every hour. Check-update will not actually do anything besides see if an update is available, and if one is it will send an alert.
What is the > /dev/null 2>&1 stuff? Crontab is running the vhserver script that LinuxGSM makes. If you run the commands manually, such as ./vhserver backup, you'll see it outputs some text. That text won't be going anywhere when run automatically by crontab, or at least it shouldn't. In reality, the tty shell in Unix systems is where all such output gets dumped to. While it doesn't break anything, it's pointless. So this chunk of code after the actual command tells the commands to dump it's output into the ether, never to be seen.
With that done you now have a Valheim game server with a number of automated starting, updating, validating, and backup systems running. Now's a good time to perform a system reboot to ensure it's working!sudo reboot
# when the system is back up, lets see if the server is running
./vhserver details# if status shows as ONLINE, you're good!
Optional steps that may be necessary given your circumstances
There are number of semi-optional steps to perform now. The most important is setting things up so other players can safely access your server.
Firewall Configuration
Depending on where you are hosting your Valheim server we'll need to do different things to ensure our players can connect to the server, while also maintaining a proper firewall so things we don't want open to the internet are closed off.
If running on a hosted service like AWS, Linode, DigitalOcean, etc.
As you're running on a hosted service, we need to enable our firewall. Most hosted services provide little to no firewall protection as they don't know what you'll be hosting and it's safer for them to leave things wide open and expect you to provide your own protections. It's time to setup those protections.
DigitalOcean has fantastic documentation in this regard. You can find a wonderful doc here: https://www.digitalocean.com/community/tutorials/how-to-set-up-a-firewall-with-ufw-on-ubuntu-20-04
While that guide is a fantastic reference, I think for this there are a limited number of instructions from it you really need.
- Follow the prerequisites, then steps 2 thru 4 on that guide. This will ensure ufw firewall is installed, then set a default policy of allowing all outgoing connection types (so your server can connect to whatever it wants) but deny/block all incoming connection types. Then you allow specific incoming connection types, such as SSH, that you actually need. Lastly it enables the firewall. This basic 4 steps will lock down your VM so only SSH will work, which you need to perform continued work on it.
- Next, step 5 is a little generic but I recommend reading it so you understand what's happening. For our needs, we need to refer back to our
common.cfgfile to get the port number, and open it along with the query port. (NOTE: I've read a number of folks saying you also need to open one more port above the query port. I haven't tested if it's actually needed or not, the default ports are not used by anything else on such a basic Ubuntu VM, so it's safe to just open it if you left the port at default). You would enter the following two commands:sudo ufw allow <your port>:<your port +2>/tcpsudo ufw allow <your port>:<your port +2>/udp- By default, Valheim requires 3 ports: 2456, 2457, 2458. This is a port range of 2456-2458. So, above, the command would look like
sudo ufw allow 2456:2458/tcpand again with /udp at the end
This will setup basic firewall rules which allow you to SSH to the server from anywhere, as well as allow anyone to connect to the game server, but deny all other traffic. It leaves the server open to connect to other things as it wants so things like server updates will still work.
The linked DigitalOcean above also includes instructions for limiting connections to specific IP addresses or IP ranges if you'd like. This would allow even further control to specific users if you'd like, but would also mean you need to micromanage the firewall rules as your player's IP address can change frequently.
Hosted at home port-forwarding requirements
If you are hosting your game server at home, you will need to setup some port-forwarding on your home router's firewall. If you've seen other documents like this I'm sure you've seen a number of folks already saying this: Each router and firewall is different, and providing instructions for each is well outside the scope of this document.
There is a good collection of port forwarding guides for different routers available at https://portforward.com/router.htm which can help you. Find the instructions for your router, and simply enter the ports as necessary.
By default, Valheim requires 3 ports: 2456, 2457, 2458. This is a port range of 2456-2458. However, if in common.cfg you changed your port, you will use a port range of <your port>-<your port+2>. The +2 is because Valheim will want to use your port for the game, your port +1 for queries (player counts, is the server up, etc.), and your port+2 for... something else folks online say is necessary but I haven't tested to confirm if it is.
General Maintenance Scripts
I created two basic "general maintenance" scripts that help automate things a bit further. These aren't necessary but I've found them helpful.
Rsync backup the LGSM made backups
At home I also run a fileshare that hosts pretty much all my stuff, and I have a Synology that I have backup said fileshare once a day. I figured it'd be prudent to backup my LGSM made backups to the fileshare for safety.
I simply did the following to make the script:
touch ~/lgsm-backup-rsync.sh
chmod +x ~/lgsm-backup-rsync.sh
nano ~/lgsm-backup-rsync.sh
I then made a directory on my file share for valheim, and inside that directory I made two more, a lgsm-backups directory and a logs directory. Logs are probably not strictly needed but I'm a fan of getting as much data as I can, so why not keep something around?
This is the script. You can copy/paste it but you'll want to change a few of the variables.
#!/bin/bash## lgsm-backup-rsync.sh#### Author:## JP Powers (jp-powers.com)#### Purpose:## This is a basic script to use rsync to copy the LGSM created backups to another location (NFS share in this instance)## global variables#### These settings are to be user edited. Adjust for your needs.## locationsWHERETO="<NETWORK FILESHARE>/lgsm-backups/" # where you want your LGSM made backups to be copied toWHEREFROM="/home/<LOCAL USERNAME>/lgsm/backup/" # where your LGSM made backups will be copied fromLOGFILELOC="<NETWORK FILESHARE>/logs" # where do you want to store logs? Logs are generated by each rsync run, and will need to be manually pruned (may add log rotation later?)## personalizationRSYNCOPTS="-PXah --del" # Change your rsync options. The default is what I use for a "mirrored" copy of the source to the local location(s). the h option can be replaced with q ("-PXaq") if you never plan to run this script manually.TIMESTAMP=`date "+%Y.%m.%d-%I.%M.%S.%p"` # Change how the timestamp is formatted. Uses standard date formatting method. (https://docs.python.org/3/library/datetime.html#strftime-and-strptime-behavior)LOGFILEPATH="$LOGFILELOC/log-$TIMESTAMP.log"#echo "rsync $RSYNCOPTS \"$WHEREFROM\" \"$WHERETO\" --log-file=\"$LOGFILEPATH\"" #test if workingrsync $RSYNCOPTS "$WHEREFROM" "$WHERETO" --log-file="$LOGFILEPATH"
The key things to change are at the top of the file. My fileshare is both an NFS and SMB share, so I just NFS mounted my share and change <NETWORK FILESHARE> to the path to the valheim folder I made. You also need to correct the <LOCAL USERNAME> to your server's username that runs vhserver. A couple more quick notes:
- Due to how bash works, in the LOGFILELOC variable ensure there is no trailing forward slash ("/") after your logs folder. You can keep this log locally on the valheim server if you'd like, too.
- The last two lines are a quick little test line that will echo the command to be run (commented out above) or run the actual command. I recommend commenting out the last line, the one that begins with rsync, and uncomment the second to last line, the one that begins with echo, then running the script with a quick
~/lgsm-backup-rsync.sh. This way you can see what the output will be before you try to run the script and you know it's doing things right. If it's good, you can just comment out the echo line and remove the comment # from the rsync line.- since echo is using double quotes you need to escape the quotes around the variables that include paths. It's not necessary to quote each of these variables if your path doesn't include special characters like spaces, but having quotes around such paths doesn't hurt so I recommend keeping it universally usable.
- The RSYNCOPTS variable here is a set of options I use for backups like this. It creates a mirror of the given source folder and maintains that mirror. If you want a full running backup, including a lot of historical backups, you can remove the
--delpart, but this will eventually create a LOT of data being used up on your backup destination. I recommend checking the rsync manpage for a better understanding of the options you can use if you want to do anything special in this regard.
Lastly we need to add a cronjob to run this script regularly. I recommend running it at least 15 minutes after the LGSM backup cronjab, in my case I did a full 45 minutes as a safety net.
run crontab -e again to bring up the editor, and add the following, again changing <user> to your local username on the server:
# backup the LGSM backups to network share everyday at 4:30am30 4 * * * /home/<user>/lgsm-backup-rsync.sh > /dev/null 2>&1
With that you'll have a backup of your backups.
Perform full server reboots twice a week
After a couple weeks of the server being in use we started noticing some strange issues in game. While we're fairly sure they're mostly caused by the game itself, it is in early access afterall, we decided performing regular server reboots would be wise.
Doing this safely required a bit of thought. LGSM is not designed to be run as root and will actually throw errors when you attempt it. That means attempting to stop the server with your root account will not actually stop the server. However, ensuring the server is stopped properly before performing the reboot is almost certainly the safest option. So, how do make sure our regular user can reboot the system instead?
I turned to linuxconfig.org for help here. The page I referenced is found here: https://linuxconfig.org/configure-sudo-without-password-on-ubuntu-20-04-focal-fossa-linux
For our purposes, I simply did the following. First, I run sudo visudo to enter the sudo editor safely. Then, above the comment for "See sudoers(5) for more information..." in the file, I added the following three lines:
# Allow jp to run reboot without sudo passwordjp ALL=(ALL) NOPASSWD:/usr/bin/systemctljp ALL=(ALL) NOPASSWD:/usr/sbin/reboot
In your case you'll want to change jp to your local username on the valheim server. Then you simply CTRL+X to close, hit Y to save, and now your user will be able to run the command sudo reboot without the system prompting you for a password. This means we can now make a quick little script to stop the valheim game server and reboot the system that can be run via a cronjob.
First, lets make a file to do this job.
touch ~/weekly-restart.sh
chmod +x ~/weekly-restart.sh
nano ~/weekly-restart.sh
Now we can copy/paste a super simple shell script (really just a couple commands) to do the weekly restart:/home/jp/vhserver stopsleep 15sudo reboot
This script does 3 things:
- Tells the LGSM Valheim server to stop. It should perform this action gracefully.
- The script than waits for 15 seconds. I do this to ensure any actions are actually completed, including something like finishing any writes from memory to disk are complete. Generally not really necessary, but a 15 second wait is worth it for safety in my opinion.
- Reboots the VM.
As we already setup the VM to automatically start the Valheim server when the VM boots up, this simple action should safely ensure that the VM itself is regularly rebooted without any major impacts to the game server. The ultimate goal is to avoid introducing anything that may cause server corruptions, hence the safety precautions.
Now we need to add a cronjob to run this twice a week. we'll run a quick crontab -e again to get into the crontab editor, and add the following:
# stop game server and reboot VM every sunday and thursday at 5am0 5 * * 0,4 /home/jp/weekly-restart.sh > /dev/null 2>&1
I have mine setup to run the weekly-restart.sh script every Sunday and Thursday at 5am. You can change as you see fit, but for me and my players this makes the most sense to avoid forced downtime and ensure stability during our peek play times.
Importing a World
This is by no means necessary, but many folks will want to do it. It's luckily fairly easy, too. I will note, if you are hoping to start a brand new adventure with your friends, it's likely best to just use a freshly generated world. I had purposely started building up my game world to use as a basis for the server, so I imported mine.
First off, I'm going to assume your attempting to import a game world from a single player campaign. Your single player game world maps can be found in specific folders:
- Windows: C:\Users\<user>\AppData\LocalLow\IronGate\Valheim\worlds
- Linux: /home/<user>/.config/unity3d/IronGate/Valheim/worlds
- Mac OS X: GREAT QUESTION, FRIEND. I dunno.
If you've only made one world, you'll only see 3 files. A steamcloud.vdf, <game world name>.db, and <game world name>.fwl. The .db and .fwl files are the important ones. You can simply zip the worlds folder to get them packed up for easy transport to the server.
If you have many worlds, you will want to find the .db and .fwl files for the specific world you want. The file name will include the name of the world, so just look for that and zip them.
With that zip, we need to get it over to your server. I use Ubuntu Desktop on my laptop, so I simply did the following:scp <worlds zip file> <username>@<server name or IP>:/home/<username>
SCP is a command line tool to copy files to a remote device with SSH. If you're on Windows there are many SCP based tools, but I've used WinSCP in the past and liked it. If you're using PuTTY to SSH to your device from Windows I believe it supports SCP natively in some way as well.
With the file now on the VM, we need to unpack it and move the files. SSH back into the machine if you've left it, and we can run the following commands:cdmkdir imported-worldsmv <worlds zip file> imported-worldscd imported-worldsunzip <worlds zip file>
Now, depending on your zip tool or how you did it, you may have a folder named worlds or you may have the world files listed here. For cleanliness, it's why we created a new directory and moved the file into it. enter the command ls to see, and if it's created a new directory simply cd <new directory>. Now, we need to move the world files we want to import to where the Valheim server can see it.mv <world name>.* ~/.config/unity3d/IronGate/Valheim/worlds/
This will move both the world files to where the Valheim game server looks for worlds files.
Great, we now have the world files in the right place. However, we now need to tell the server to look at and load that world. Lets change back to home directory and edit the common.cfg file to do that.
cdnano lgsm/config-lgsm/vhserver/common.cfg
The setting we want to change is gameworld. Setting this equal to the name of the game world file name (without the file extension) it'll tell LinuxGSM to start the Valheim server with that map. For instance, my game world is named Terry. So, I have a Terry.db and a Terry.fwl file in my worlds folder. In common.cfg, I set gameworld="Terry" and that's it. Restart the game server with a quick ./vhserver restart and when you connect you'll see your imported game world.
Speaking of, lets talk about how we connect.
Why'd you name your world Terry? I dunno, what'd you name your world? Something all viking themed because you're boring? Live a little dude, give stuff people-names.
Connecting to your server
Connecting in Game
In game, you can now join a server by entering the IP or hostname of the server. Currently, it doesn't appear to save this so you'd need to enter the IP every time. That said, it's quite easy to connect quickly.
Open the game, create or select a character, and click START. It will let you create or join a local world on the Start Game tab, but we want to use the Join Game tab to connect to a remote world. From there, click the Join IP button. Enter <server IP>:<port> or <server name>:<port>. If a password was set, it will prompt you for a password. As an example, if your server is running on IP address 192.168.0.101 and you changed the port to 5454, you would enter 192.168.0.101:5454. If your server is running on a locally hosted device named valheimVM on the standard port, you'd enter valheimVM:2456. If you're using a hosting provider you can purchase a domain and point said domain at the IP for your server to do something similar. I own a couple domains and have one pointed at my home IP, so I'm able to give my users that domain name to use for my home hosted server.
Adding to Steam Servers List
NOTE: I'm leaving this for now, but due to changes in the Valheim game server it appears that this is no longer working for private dedicated servers. You can add the server to the list, but it will always appear as not responding.
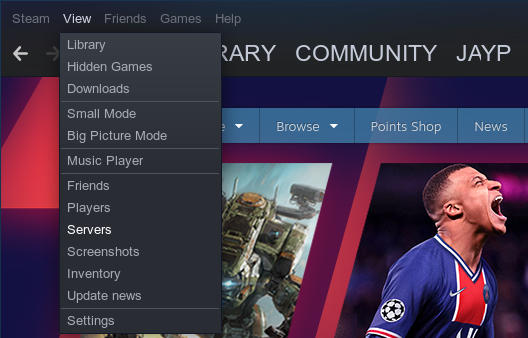
For a more permanent solution, we'll need to add the Valheim server to our Steam favorite servers list. On the very top of the Steam window, select View in the menu, and then select Servers.
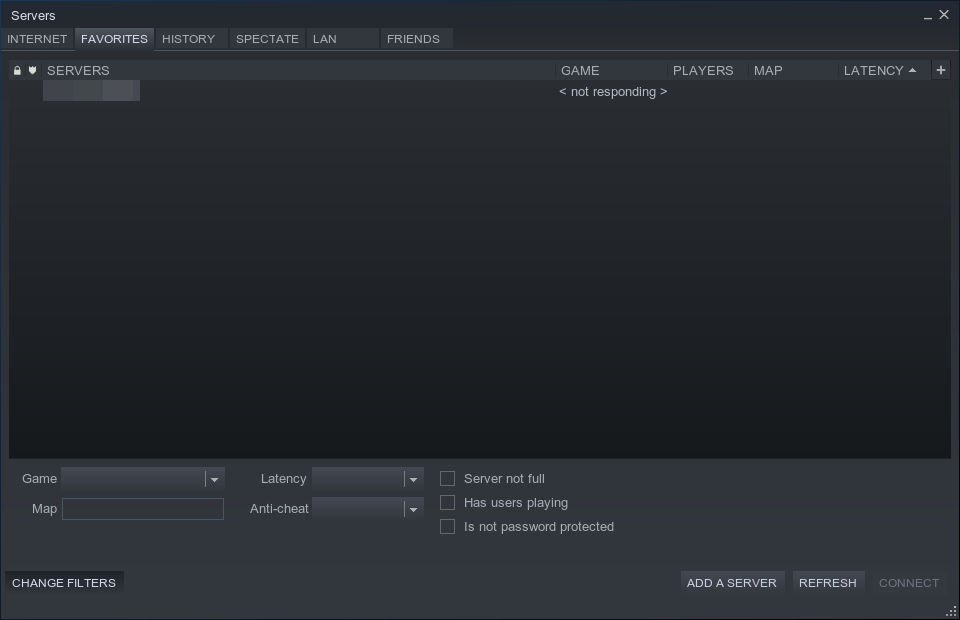
In the window that opens, select the Favorites tab. If you've Favorited servers in games you play via Steam there may be a lot of servers listed here. I cleared mine out to reduce confusion for the sake of this document, but you can use the CHANGE FILTERS button on the bottom right to filter for specific games in the future. For now we're just adding another by clicking the ADD A SERVER button on the bottom right.
In the new window that opens, you'll want to enter the following then click ADD THIS ADDRESS TO FAVO...
<server IP>:<port>
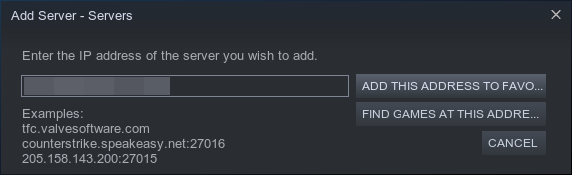
As an example, if your server is running on IP address 192.168.0.101 and you changed the port to 5454, you would enter 192.168.0.101:5455 Note, you need to use the port you set +1 because Steam needs to use the Query port that Valheim uses.
Once added you'll be returned to the second screenshot above.
Connecting from Steam Server List
Simply double click the entry or select it and click CONNECT on the bottom right and you'll be prompted for a password by Steam. This password can be anything, the actual password prompt will be in game.
IMPORTANT NOTE: Right now there is a bug with either Valheim's server code or Steam, where the list will show the server information for a moment then suddenly display <not responding>. This is still the easiest way to connect consistently without needing to enter the IP and port every single time. To work around the bug, simply hit REFRESH on the bottom and as quickly as you can double click the server entry. If you are prompted for a password, you'll be able to connect.
When connecting, Valheim will load directly to the character select screen. Pick your character, and if you set a password you'll be prompted for it when Valheim itself starts to connect to the server.
Add yourself as Admin on the server
Valheim uses a Steam ID number to know who you are on the server. When you're connected to the game, if you hit F2 it will show some server stats including connected players. To the right of the player names you'll see a long number, that's what we need. Alternatively, you can get this number from the console logs, but admittedly they're kind of a mess and hard to figure out exactly, so I recommend getting the Steam ID from the in game F2 menu. With your Steam ID noted, lets add you to the admin list.
cdnano .config/unity3d/IronGate/Valheim/adminlist.txt
To add yourself to the list, go to the bottom of the file and enter your Steam ID number. As the file already says, if you want to add multiple entries, you need to enter them one per line.
Once you're setup as an admin, in game you can hit F5 to get access to on-server commands. Right now they allow you to add others as admin, kick users, ban users, and see a bit of information like the current ban list and some server stats.
For most users, doing such administrative tasks in game will be best. However, if you ever need to, in the same directory as the adminlist.txt there is a bannedlist.txt and permittedlist.txt that will black list or white list Steam IDs respectively.
Conclusion
And that's it. You now have a dedicated Valheim server running on linux. It is set to automatically start, it will automatically do validations and backups, and can notify you of updates for the game server as well as applying those updates. For security, it's setup to only allow certain kinds of connection thru, as well. You can log in semi-regularly, and run ./chkupdates.sh to ensure Ubuntu and it's underlying items are also updated.
My server has hit a peak of 7 users logged in at once, and when we were bunched up we were experiencing some server lag. When we spread out the lag mostly went away. I was monitoring the performance stats of the VM while doing this and both bandwidth, CPU usage, and memory usage were all well under control and not brushing up against any limits. I have read that Valheim, both the server and client, have a hard-coded cap of 64KB/s network traffic, and when players bunch up it starts to to hit that cap and create lag. There are ways to edit the DLL files to increase those hard-coded caps, however when updates or validates are run these changes will be "corrected." I'm simply waiting for IronGate to hopefully increase these limits.
All that said, you are done. Go forth, enjoy Valheim, and share in the glory!